We at GeeksULTD recently moved to a VPS server. We though that after a year of building an audience that crave for our content, we’d rather move to a better hosting solution. Formerly, GeeksULTD.COM was hosted on InMotionHosting which is one of the better known hosting providers out there.
With me given responsibility to move the site, it was a task I had to get done. I had previously worked on Shared Hosting sites but had never ventured into VPS, so this was my first move and experience. While we definitely weren’t sponsored by IOZoom, we found there solutions and pricing much more intriguing compared to Interserver’s pricing scheme. So our first goal was to find a good VPS provider for our website that utilizes KVM rather than OpenVZ that runs on Linux. After hunting for options, IOZoom’s Linux KVM 2GB unmanaged hosting plan became our choice.
Once we had our VPS activated, it was time to setup our unmanaged VPS to start grinding. Here’s our step-by-step guide on how to move your WordPress site from one server to another.
Tools Required:
- Cyberduck
- Bash/SSH Terminal
- Your login credentials for your old and new hosting account.
- Adminer
- Notepad
Extra Notes:
We wanted to clear up some stuff here. For those who are looking to setup a brand new VPS server with a fresh content of WordPress, simply follow step 3 and 4 and you’ll be done. For other users, we’d recommend that you follow the full guide if you want to move your WordPress site to a new VPS.
01| Backup Your WP-Content Folder and wp-config.php file.
If your currently hosting provider allows you to access your website through cPanel, you could easily backup your “wp-content” folder. It is usually located in the “public_html” folder. Just right click and compress it if you’re using cPanel or compress it using an FTP client such as CyberDuck by using the “Create Archive” option in CyberDuck.
After that you’ll see a “wp-content.zip” folder in the same folder where the wp-content folder exists. Now is the time to download the wp-content.zip and wp-config.php file to your computer. Wait while it downloads as this may take some time to download depending on the size of your site.
02 | Export Your Database
While the “wp-content.zip” is downloading, now is a good time to export your database. No matter if your webhost uses cPanel or not, we would recommend you to download Adminer which is a single PHP file that allows you to login into your database. After downloading the adminer file rename that file to adminer.php and upload the file to your old host’s public_html folder. After that’s done try accessing the adminer by using your site’s URL followed by adminer.php.
Your URL should look like this:
yourwebsitedomain.com/adminer.php
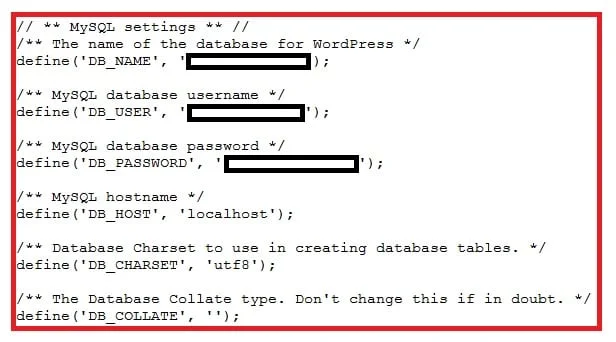
Once you access that URL the webpage would ask you for your database login credentials. To find your password and database name, simply open the wp-config.php file in any text editing program you feel like to, and look for your database name and password. Simply copy and paste the credentials into the adminer webpage we opened earlier.
Once you’ve made it inside, simply select the database, tick all of the databases inside of it and click on “Export” located on the left side of the page. Once that’s downloaded, we’re done with the backup process, that’s all we need.
03 | Time To Get Our VPS
Now that we have our files ready, now is the time to get our VPS up. Make sure you get a VPS that has Ubuntu 16 installed onto it. After activating your VPS, often your host would send you an email that contains all of the passwords and login credentials for your hosting account along with your IP address. Now is a good time to copy all of the login credentials into a text document as we would need them sooner or later in the moving process.
04 | Setting up our VPS with EasyEngine And Installing WordPress
We’ve tried ServerPilot in the past, and opted for EasyEngine as we found that our website ran much faster under EasyEngine so we’ll guide you on how to set that up.
To install EasyEngine, you need to have access to a Bash/SSH Terminal, this is where I would recommend CyberPutty if you are on Windows 8.1 or earlier. If you’re using Windows 10, Windows 10 comes with the Bash Linux terminal since the Windows 10 anniversary update. To enable it in Windows 10, follow How-To-Geek’s guide on How To Enable Linux Bash in Windows 10. Or to keep it simple, just install CyberPutty as it works with Windows 10 as well. Once you get your ssh terminal installed, there’s a few commands you’re going to have to run. Here they are.
wget -qO ee rt.cx/ee && sudo bash ee
Once that’s done, open a notepad, edit the following command and replace “example.com” with your website’s domain name. Just make sure that you do not add www. as a prefix in front of your domain name.
sudo ee site create example.com –wpfc –php7 –letsencrypt
The command above would allow you setup your domain name with the help of EasyEngine’s automated installer and will also install some extra pre-requisites such as HTTP/2 over HTTPS, PHP7 and NGINX Cache. This is what we use here at GeeksULTD.COM as we find out TTFB way better with NGINX cache on after a simple tweak that we’ll cover up later in this guide. Once you start running the command, it may take some time and it may prompt you for some details such as your email, name and other simple details. Just fill them in as you wish and you should be up in no time.
05 | Restoring Your Content
Now’s about time that you start restoring your content. Start by logging into your VPS with your preferred FTP client, once you’re in. Head over to this directory to upload your wp-content.zip file.
/var/www/example.com/htdocs/
Yet again, please do note that “example.com” is just an example, your domain should be there in the place of example.com. Once you’re in the /htdocs/ folder, simply upload your wp-content.zip file. While you’re working on that, now’s a good time to upload adminer php to the htdocs folder as well.
Once both adminer and wp-content.zip has been uploaded, now’s the time to restore our database. To do so, first download the wp-config.php file from:
/var/www/example.com/
This file contains your database login information. Simply use this as a reference to login into Adminer. Open adminer by going to your VPS’s IP address and then adding /adminer after it. It should look something like this.
[VPS IP Address]/adminer.php
Use the database name, database username and database password that’s available in the wp-config.php folder to login into Adminer. Once you’re in, find and click on import, choose your old hosting’s database backup that ends with “.sql” and then “Execute”.

Once that’s done, copy the prefix from your old wp-config.php file that you downloaded from your old hosting provider and paste it into the new wp-config.php file and re-upload it to:
/var/www/example.com/
Once that’s successfully done, we’re almost there and its now time to unzip our wp-content.zip folder. There’s two ways to do this, either with a command line, or either with Cyberduck’s easy expand option that does it for you. That’s the reason why we’d recommend Cyberduck. If for some reason the Expand option is greyed out in Cyberduck, that simply means that you haven’t installed zip and unzip onto your VPS. To install them, login as root into your SSH terminal. Next, run these two commands.
sudo apt-get install zip
sudo apt-get install unzip
Once that’s done, make sure you restart CyberDuck and login as root again. Once you’re in, go back to the /htdocs/ folder and right-click on the wp-content.zip file, then “Expand Archive”. Give it a few minutes to expand and try not to refresh or close the client.
06 | Fixing Permissions
As a pre-caution, some users may have issues with uploads, for that, simply run these three commands one by one and you’re done. The first command corrects the owner of the folder.
chown -R www-data:www-data /var/www/example.com/htdocs/wp-content
The second one simply fixes the permissions for the directories
find /var/www/example.com/htdocs/wp-content -type d -exec chmod 755 {} \;
Lastly, this command fixes the permissions for the files
find /var/www/example.com/htdocs/wp-content -type f -exec chmod 644 {} \;
07 | Time To Change Your Nameservers
Finally, the last step of this guide, it sure took me a while. Now for users to be able to view your website from your new VPS, now’s the time change your nameservers to your VPS provider’s NS. If you have’t got one, you could simply ask them to provide you their nameservers. If you don’t know how to, a simple Google search would get you there.
08 | Improve TTFB/Speed
As an optional tip for those who followed the guide until the end, there’s actually an excellent tweak that you could apply to your VPS that would improve your TTFB. Navigate to the following directory:
/etc/nginx/conf.d/fastcgi.conf
And download the “fastcgi.conf” file and make a copy as a backup in another location. Then open and modify/replace these lines in the “fastcgi.conf” file then overwrite file
fastcgi_cache_path /etc/nginx-cache levels=1:2 keys_zone=phpcache:100m inactive=60m;
fastcgi_cache_key “$scheme$request_method$host$request_uri”;
Then restart your VPS anyhow you feel is right. I personally found this tweak on DigitalOcean’s forums
Thanks to all of those who have finally reached the end of this guide. Also, as an end note, a huge shoutout to Liew from www.LiewCF.com for helping me and encouraging me to move to a VPS. He is a gadget freak and is also an excellent WordPress consultant. Check his blog out on the link above. And that’s it.
If you’re stuck and need help, let me know in the comments below and I’ll definitely help you guys out.


