Windows ten LogiLDA.dll error messages generally seem throughout or before long once a tool starts up after being turned on, awaken from sleep, or restarted. If the pc is previous or has many tasks running at once, the LogiLDA.dll warning will appear a couple of minutes after the Windows 10 device becomes active and usable.
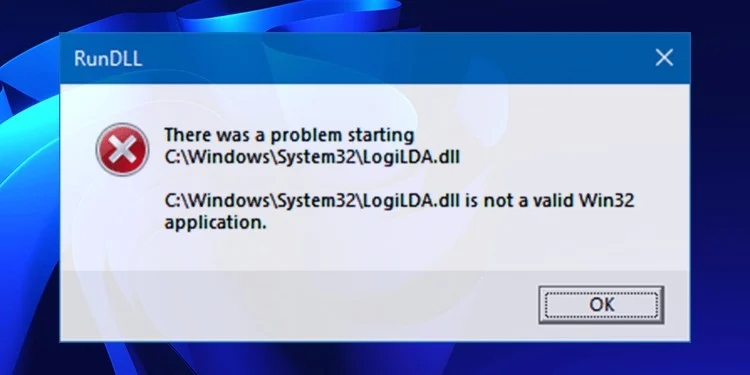
The LogiLDA.dll file is sometimes related to programs similar to Logitech transfer Assistant, which is usually placed on a Windows ten device once the installation of a replacement piece of Logitech hardware such as a Logitech diversion mouse or keyboard. Some Windows 10 computers could escort the Logitech transfer Assistant software system pre-installed.
The Logitech transfer Assistant mechanically searches for brand new device drivers and software updates for any detected Logitech merchandise upon startup. If there was a tangle beginning LogiLDA.dll, this might mean: The file wasn’t put in properly and is missing from the program. A recent Windows update could have caused the program to start finding out this move into the incorrect location.
How to Fix LogiLDA.dll Errors in Windows 10
- Restart your Windows ten device. Restarting a Windows 10 computer, tablet, or hybrid device resembling a Surface will fix a range of issues and may continuously be the primary factor to try.
- Install the most recent Windows ten update. additionally, to add new options and up your device’s protection against malware and viruses, Windows 10 updates may also correct any file errors you’ll be experiencing.
- Reinstall your mouse device drivers. LogiLDA.dll errors will be caused by a Logitech program put in on the computer. These errors are triggered by drivers installed for the mouse. Open Device Manager > Mice and different inform devices, right-click the mouse name, then choose Uninstall Device. once the method completes, disconnect the mouse, restart the Windows ten device, and so reconnect the mouse.
- Disable LogiDA on startup. Press Ctrl+Alt+Del, select Task Manager, then choose Startup. Right-click on LogiDA from the listing of applications that are set to run on startup, after which choose Disable.
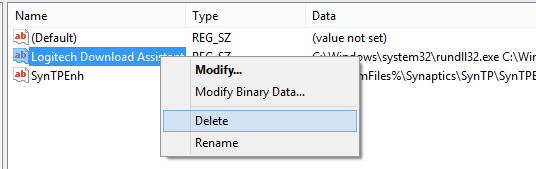
- Uninstall the Logitech program. If your laptop continues telling you that there has been a hassle beginning Windows LogiLDA.dll, some other manner to restore it’s far to uninstall the program. This may be performed via way of means of commencing Start > All apps, right-clicking the Logitech program, and deciding on Uninstall.
- Try Logitech recreation code instead. Logitech recreation code could be a newer Logitech program that will keep hardware up-to-date, and it additionally allows you to customize device functions for specific use cases. Uninstall Logitech transfer Assistant by following the strategy shown above, then download the Logitech recreation code from the Logitech website.
Reinstall the Logitech application. If you choose to use the supplied application for putting in tool drivers or software program updates, reinstall it from the disk you started with and established it after uninstalling it.
Always be updated with us visit GeeksULtd for Real-time Updates


